Wednesday, 25 January 2012

Chinese New Year Nails

This is a blog on how to create Chinese New Year nails.

These are the nail varnishes I used to create my nails. 


1) Apply a base coat first over your nails.

2) Pick a dark red nail varnish and paint every nail. You may want to do 2 coats to make it more opaque. I used Barry M for this.

3) Then on two of your nails (your thumb and ring finger) paint the tips of your nails with gold. I used Miss Sporty nail varnish colour for this.

4) On the other nails using a dotting tool decorate with a flower in gold.

5) Now on the nails with the gold tip paint on the Chinese symbol for good fortune facing you. I used Nail Inc Oxford Street black for this.

6) Apply a top coat of clear nail varnish to protect your design. And you're done!! :)


Sunday, 22 January 2012

Chinese New Year

The first day of the Chinese Lunar month is on the 23rd January. So the celebration starts today and finishes next Sunday. This year is the year of the dragon.

To celebrate I have made some fortune cookies and as a family we are having a Chinese food feast with home made prawn toast (this has got to be the best holiday ever!)

So to start this is how I made the fortune cookies.


Ingredients 
  • 1 egg white
  • 1/8 teaspoon vanilla extract
  • 1 pinch salt
  • 1/4 cup unbleached all-purpose flour
  • 1/4 cup white sugar
Directions

Preheat oven to 400 degrees F. Butter a cookie sheet. Write fortunes on strips of paper about 4 inches long and 1/2 inch wide. Generously grease 2 cookie sheets.
Mix the egg white and vanilla until foamy but not stiff. Sift the flour, salt, and sugar and blend into the egg white mixture.
 
Place teaspoonfuls of the batter at least 4 inches apart on one of the prepared cookie sheets. Tilt the sheet to move the batter into round shapes about 3 inches in diameter. Be careful to make batter as round and even as possible. Do not make too many, because the cookie have to be really hot to form them and once they cool it is too late. Start with 2 or 3 to a sheet and see how many you can do.
 
Bake for 5 minutes or until cookie has turned a golden colour 1/2 inch wide around the outer edge of the circle. The centre will remain pale. While one sheet is baking, prepare the other.
 
Remove from oven and quickly move cookie with a wide spatula and place upside down on a wooden board. Quickly place the fortune on the cookie, close to the middle and fold the cookie in half. Place the folded edge across the rim of a measuring cup and pull the pointed edges down, one on the inside of the cup and one on the outside. Place folded cookies into the cups of a muffin tin or egg carton to hold their shape until firm.

This is how you make prawn toast.

1) Put some prawns into a blender with some ginger and blend until you get a smooth paste.
2) Spread the paste onto a slice of bread.
3) Sprinkle some sesame seeds on top.
4) Fry in some olive oil in a pan for a couple of minutes.
and it's done.


 This is a picture of our feast and it was yummy!!

Saturday, 21 January 2012

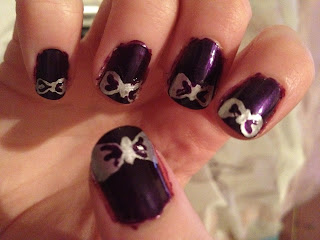
Pretty Bow Nails

Here is how I made pretty bows on my nails.

These are the nail varnishes I used.
1) Apply a base to your nails.

2) Paint all your nails the same colour. For this I chose to use Barry M Vivid Purple but you can use any colour you like really.

3) Then using a paint brush paint on a simple bow shape. For my bows I have used Barry M Silver Foil but again you can pretty much use any colour.

4) Now for the detail on the bow using a cocktail stick paint on the detail with the same colour as the rest of you nails.

5) Neaten up the bow again using the cocktail stick with the colour of your bow.

6) Now go over the top with clear nail polish to protect your design and there you have it pretty bow nail design.

Friday, 20 January 2012

Giant Cupcake Cake


This is the first time I have ever used one of these giant cupcake moulds so was very nervous about the outcome.

I brought my one from Wilkinsons for £6.99. Sadly it didn't come with any recipes so I had to search online for a suitable one.

This is the recipe I used and changed it a bit.

Ingredients
Serves: 14
For the giant cupcake:
275g (10oz) unsalted butter, softened
275g (10oz) golden caster sugar
grated zest of 1 lemon
6 large eggs, beaten
400g (14 oz) self-raising flour
140g (5 oz) plain flour
75ml (3 fl oz) milk
For the buttercream:
115g (4oz) unsalted butter, softened
225g (8oz) golden caster sugar
2 tablespoons lemon juice
3 tablespoons seedless raspberry jam
To decorate:
Small sweets, such as Dolly Mixtures
Chocolate bars cut into thin slices
Sweet necklaces
White and milk chocolate writing icing

Preparation method
Prep: 45 mins | Cook: 1 hour 15 mins
1. To make the cake, preheat the oven to 170 degrees C / gas mark 3. Brush the two halves of your giant (2.4 litre) cupcake tin with oil (or cooking spray) and dust with flour.
2. In a large mixing bowl, beat the butter, sugar and lemon zest together until creamy. Gradually beat in the eggs a little at a time, beating well after each addition. Sieve in the self-raising and plain flours and stir in with the milk.
3. Spoon the mixture into the tin, filling each half about three-quarters full and hollowing out the centres a little as both cakes will rise quite a lot. Bake for 1 hour 5 minutes - 1 1/2 hours or until a skewer pushed into the centre of each cake comes out clean.
4. Cool in the tin for about 15 minutes before turning the cakes out onto a wire rack to cool completely.
5. Trim the tops of the two cakes level and spread the base with the jam and about two-thirds of the buttercream. Sandwich the cakes together and spread the top part with the rest of the butter cream. Cover with small sweets and pieces of chopped chocolate bars pressing them gently into the icing to fix them in place. Finally drizzle chocolate writing icing over the top.

Firstly I did add the lemon zest just put in vanilla essence and I also made it multi coloured.

This took a bit of time are I have to mix all the colour separately but from what you can see for the picture it didn't come out to bad. The colours didn't come out as strong as I had hoped but I think this may have been because I used Morrisons own food colouring rather than going to a cake shop to buy a make, but at least I know for next time.

<- This is how the colours looked before baking.


 This is how the inside of the cake turned out. Some colour were a lot stronger than others.


I am very pleased with it and the Birthday Girl loved it.

Nail- Pretty Flowers.

These design is so cute and can be done with pretty much any colours. Here is what you do. 

These are the colours I used to create this design.

1) Firstly apply your nails with a base coat. I use Avon clear nail varnish.

2) Then pick a colour and paint all your nails to same colour. I went for a purple/brown sort of colour.I don't really know where I got this colour from as it's just an old one I found.


3) Using a dotting tool starting with white make 4 small dots in a circle these are the petals. I did this by using the Rimmel London Cloud white and Nails Inc London Oxford Street black.


4) Then using a cocktail stick pull the dots to the centre to give them the petal shape. Like the picture on the left.

5) Repeat the above with black. You should be able to fit two flowers on each finger and 3 on you thumb depending on how long your nails are.


6) Using the opposite colour to the petals make a dot in the centre of the flower.

7) Then go over the top of your pattern with a clear varnish to protect it and you're done!


Remember you can experiment with loads of different colour combinations.

Enjoy!!

Nails- Red and White Polka Dot


Here is how I created the red and white polka dot nails. 

These are the nail varnishes I used.

First apply a base coat. I just used an Avon clear nail varnish. This is to stop the colour from dying your nails.

Then apply a red. You may want to do a couple of coats to make it opaque. I used OPI meep meep meep which is part of the Muppet collection.

Then using a doting tool apply white dots, I used Rimmel London Clouds varnish. If you don't have a doting tool you can make you own which is what I did and use a straightened hair slide.

Lastly using your dotting tool again make a small black bow on the nail.

Remember to go over your pattern with clear varnish to protect it.


And there you have it.


Wednesday, 18 January 2012

My Family Tree


As part of my Look Wider Octant Personal Values I decided to try and do my family tree.

This took a lot of time just typing it all up on the website I found. The information you needed to include was name, date of birth, marriage, alive or dead, date of death etc etc. There was lots of information to include and quite a lot of it I didn't know. My Mum was able to tell me with most of it from her side of the family and luckily her uncle had managed to work it back to my Great Great Great Grandparents. On my Dad's side it was much harder to find out the information. My Mum was able to help me with some of it like my Dad's Aunts and Uncle and Cousins but past my Grandparents was a bit tricky, to be able to continue past there I am going to have to do a bit of digging and may ask my Dad for some help (not that I think he will remember much). Will update when I get further and let you know my findings that is if I get any further.

Christmas Blog

May be a bit late but better late than never I guess.

Over Christmas I did some baking of course. Now I love baking and like to be a bit creative with it so here are my Christmas pudding chocolate cakes which melt in the middle!! All I did was a basic chocolate cake mix then a spoonful of chocolate spread (I used white and a milk chocolate one) and then another layer of the mix to cover it. I also made biscuits which is a butter biscuit mix and my Christmas cutters which I got from Morrison's.

This is the Christmas tree in my room. This has lots of bits that I have made with the kids on and of course a Hello Kitty on top.

Now for the presents!!

I got lots of Hello Kitty things (think I am starting to get a bit obsessed), Disney DVDs, clothes, converse, bead for my bracelet, money and lots of other nice things, I really did get spoiled this year.

This is Mark and I in our new dressing gowns.

The cats didn't get left out of course Santa put some presents in their stockings. They both got a new collar, brush, food bowl, treats and cat nip. They went crazy for the cat nip. Oh and not forgetting a Christmas bell collar which made them look soooo cute.


Also over the holiday I got to spend lots of time with my family and lots of time relaxing which was nice. Sad to be back at work but now the countdown begins for my Birthday :)